Showing posts with label How to. Show all posts

08 August 2012

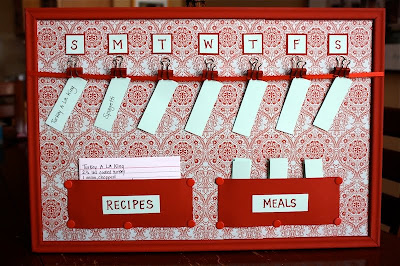
Custom Menu Planning Board


I love Pinterest! I know I've mentioned it before, but I get so many outstanding ideas! My latest idea came in the form of "what are we doing for dinner?" and my response being, "I don't know, let's go out." Thanks to that response (in addition to other factors) I've been lacking the weight loss journey. Let's just say, I am maintaining well, but losing is very hard. Knowing that, I have decided we need to plan better for dinner (which is a downfall for our family, calorie and budget wise).

First I planned my week, Hubby works W-F nights, so it needs to be easy and light. Tues & Thurs Chandler and I have Taekwondo training until 6:30, so it has to be quick and easy to prepare or Hubby has to make it (Tuesday only). Mondays are going to be Singing Christmas Tree practice soon, so it has to be easy. So knowing those things. I needed to be able to plan for the grocery shopping and so I don't go crazy during the week.


I got my ideas for a Menu Planning board from here:

 Magnetic Menu Board-Separate side dish magnets.
Meal Planner Menu Board

DIY menu board- She wrote the recipes on the back, BRILLIANT!

I took ideas from each one of these and I am pleased with the results.

Supplies needed:
1 cork board tile, this one is 14x14 (Target, $8 on sale)
18x18 inch square of fabric or size for your board. (I used scrap fabric)
2 18" long pieces of bias tape in coordinating color (I had scrap bias tape)
10 safety pins, the larger size (about 2" long).
Thumb tacks (7-8)
Cardstock in color(s) of choice. ($5 for the pack at Target)
Staple gun with staples
Hot glue gun and sticks
Command Picture Hanger Strips ($9 for assorted pack at Target)
Bound Presentation Binders ($8 ea at Office Depot)
Magazine holder (I had an Ikea one)

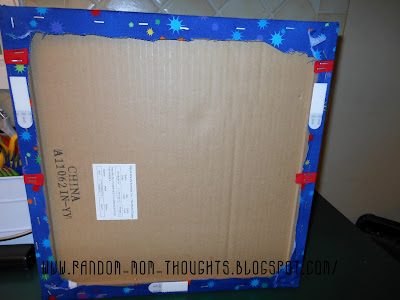
Staple fabric to the cork side of the board. I used more staples than I needed, but I wanted it to be nice and tight. For the corners, I just tucked and made it look nice, using strategically placed staples.  Once finished cut extra off.


Using your computer write up all your yummy dishes. I did mine color coded (no loving the blue though). Red=beef, Chicken=Orange, Pork=Yellow, Misc/breakfast for dinner=Blue, Sides=Green, New recipes, going out, babysitter, pizza=White. I cut the strips using my paper cutter. Don't forget your days of the week as well! One thing I will say, on the back of each strip, are the main ingredients for the dish, that way when I grocery plan, I can know what I really need to add to the list. Loved that idea from one of the boards above!

Now that I know how long the strips would be I can attach the biased tape. Do 2 rows, one for main dish and one for side dish. The main dish strip is about 1.5-2" down from the top, and the side dish bias tape is about 7 inches down from the top. Cut your biased tape and wrap it around, pulling nice and tight, and stapling it on the back.
Using my hot glue gun, I attached the days of the week to the very top of the board. Then I used my handy ruler to go vertically, and I put a dab of glue under the bias tape to keep the paper clips from moving over. You can't see it, but it keeps things nicely spaced, in my opinion.

A note about Saturday's in this photo: It says Babysitter (main dish) and Pizza (side dish).
So I know what we need to do for the sitter. EASY!


Add your paper clips (I know I had binder clips in the "Supplies" photo, but they were too stiff, so I changed plans, and I like this result much better). I used white on top and black on bottom. I had them, why not? Underneath the red bias tape is the hot glue dab, can't see it! But it keeps things lined up nicely (I am anal about that).


I used Command Picture Hanger strips to attach it to my cabinet door. So easy and not permanent.


To hold the various menu items, I cut a Crystal Light container in half, then cut a hole in the lid. Then I hot glued the lid to the top to keep it cleaner. I used a scrap of paper to cover it. Attached it to the door with a Command strip. I also used a small square of scrap paper and thumb tacks to make a small pocket on the board itself. It holds the side dish options. I made these in code, like the Magnetic board linked above. Q=Quinoa, B=Bread, P=Pasta/Potato, F=Fruit, S=Salad, R=Rice, V=Vegetable This makes it easy! Normally I give the kids the choice on the veggie, so in addition, they might pick something out in addition, which is fine with me.


Then I went to Office Depot, bought 3 Bound Presentation Binders that held 48 sheets. Divided it up and put all my recipes inside. Then I put them in an Ikea Magazine holder on the counter.


All Finished! And ready to be used! Let me know what you think, by commenting!
Photobucket

17 February 2012

Lego Birthday Invite-How to!

I am working on Chandler's 7th (gasp) birthday party. It's a Lego theme. :) No surprise there. So after playing and having a ton of "waste my time" time on Pinterest (what?! You don't know what I am talking about?! You must find out what this amazing, awesome, place is, like yesterday!) I found some ideas for his party. Here's my board, you can find some ideas here, need an invite (It's invite only), leave a comment. I'll hook you up. Melissa on Pinterest

Supplies:
Card-stock in kiddo's favorite color or Lego colors (yellow, red, blue)
Photo printed
Paper cutter
2" diameter circle cutter or circut
Black thin Sharpie
Foam Adhesive circles
Double sided tape

Chandler's invite is a 5x5 inch square of  card-stock (scrapbook paper I had laying around, in yellow). I snapped a photo, and edited it in a graphics program (Fireworks CS3). He's holding a Lego Base Plate with Legos around and the number 7 in the center (Thank you Pinterest). I played with the photo, composition and how I wanted it to look. I shot him on the patio and I was up on a chair. I knew I needed the shot to crop to 4x4" square. I think I took 25 shots. I did my editing magic making him black and white and keeping the Lego 7  in color. Sent to Costco, had them printed on 4x6, and then cut them down to size. Then I used some double sided tape to attach. This was the easy part. I added "Chandler is" to the top since I figured, I should make it a bit more obvious. ;)


I bought some Foam Adhesive Circles at Michael's to give the Lego Stud 3D effect.


I also bought a 2" diameter circle punch to cut out 70+ circles. Much easier and worth the $8-10! If you have a Circut, then you could use that I am sure. I just don't have one, yet. LOL. You can see above how the back part of the invite is done.


I wrote all the details on the circles with a thin black Sharpie. Yes, hand written, it does suck, but whatever.  I added 4 foam circles to the invite, making them evenly spaced to give the 4 stud Lego look. The foam circles stick out just enough to give it definition. 

I added a map that I had drew in my graphics program, that included the address of the location as well as my cell if they get lost.


Last but not least, I had some orange envelopes from a previous b-day invite, so I used those. Nice and bright and it set the tone perfectly. Chandler loved his invites. And I loved the photo so much I had Costco print an 8x8" print that I am going to frame for his party. And yes, I am giving myself a pat on the back. :)

Hope you enjoy! If you need a Pinterest invite leave your email and I'll help you out. There are so many great ideas there! Enjoy!
Photobucket

12 December 2008

UPDATE:Ipods... A love/hate relationship: How to upgrade your iPod hard drive!

12/28/08 Update:
So the fix didn't work for my Ipod... I think it's actually a motherboard issue. Oh well... No biggie, I was given a new Ipod Touch 16GB for Christmas (Thanks Mom!!!). Now the old ones are being tossed! Woo! This new Ipod is amazing! It even has Wi-Fi! Unbelieveable! :) I am in love... I wish I could have an Iphone now. Drool!


So I have had an Ipod for some years now, I belive I started with a 3G and now have a 5G U2 edition. Love them...But also hate them at the same time! My 3G is still sitting in my drawer w/ a broken hard drive. After replacing it with my 5G, I couldn't get rid of it, for some stupid reason... Fast forward to 3 weeks ago. My newer one decided to do the SAME thing. Broken hard drive. Well we don't have the cash to replace it, so I did some fancy googling and learned how to replace the hard drive. WOO!

So I cracked open my Ipod and pulled out the hard drive and figured out what model HD I'd need. Off to eBay to buy one, because you can't get them in stores. I actually thought Fry's might have them and when I called, the person said I couldn't replace the HD but he'd love to sell me a new one! Right, I'll be right there (insert sarcasam here). So I bought the new HD and waited... and waited...and waited.

It came yesterday and I put it in, following the instructions I read on a blog (link below). And then I got it to work, well at least the apple logo and sad faced Ipod came on. But I was having trouble getting it to go into disk mode. Well today I sat down and pulled the HD back out and dinked (techinical term) with it.

And it worked! YAY! I was so excited! It's still acting funny, makes me think the motherboard is not happy, but it's playing my Christmas music and frankly I just need that and my Beethoven at night. So if I can play that I'll be happy. But when I opened iTunes, I realized I have 3200 files on my iPod! Wow.

So anyway, here's the link to how to replace your hard drive on your iPod, including model numbers for all generations of iPods!
http://www.command-tab.com/2007/03/11/upgrading-ipod-hard-drives/