Showing posts with label Craft. Show all posts

08 August 2012

Custom Menu Planning Board


I love Pinterest! I know I've mentioned it before, but I get so many outstanding ideas! My latest idea came in the form of "what are we doing for dinner?" and my response being, "I don't know, let's go out." Thanks to that response (in addition to other factors) I've been lacking the weight loss journey. Let's just say, I am maintaining well, but losing is very hard. Knowing that, I have decided we need to plan better for dinner (which is a downfall for our family, calorie and budget wise).

First I planned my week, Hubby works W-F nights, so it needs to be easy and light. Tues & Thurs Chandler and I have Taekwondo training until 6:30, so it has to be quick and easy to prepare or Hubby has to make it (Tuesday only). Mondays are going to be Singing Christmas Tree practice soon, so it has to be easy. So knowing those things. I needed to be able to plan for the grocery shopping and so I don't go crazy during the week.


I got my ideas for a Menu Planning board from here:

 Magnetic Menu Board-Separate side dish magnets.

Meal Planner Menu Board

DIY menu board- She wrote the recipes on the back, BRILLIANT!

I took ideas from each one of these and I am pleased with the results.

Supplies needed:
1 cork board tile, this one is 14x14 (Target, $8 on sale)
18x18 inch square of fabric or size for your board. (I used scrap fabric)
2 18" long pieces of bias tape in coordinating color (I had scrap bias tape)
10 safety pins, the larger size (about 2" long).
Thumb tacks (7-8)
Cardstock in color(s) of choice. ($5 for the pack at Target)
Staple gun with staples
Hot glue gun and sticks
Command Picture Hanger Strips ($9 for assorted pack at Target)
Bound Presentation Binders ($8 ea at Office Depot)
Magazine holder (I had an Ikea one)

Staple fabric to the cork side of the board. I used more staples than I needed, but I wanted it to be nice and tight. For the corners, I just tucked and made it look nice, using strategically placed staples.  Once finished cut extra off.


Using your computer write up all your yummy dishes. I did mine color coded (no loving the blue though). Red=beef, Chicken=Orange, Pork=Yellow, Misc/breakfast for dinner=Blue, Sides=Green, New recipes, going out, babysitter, pizza=White. I cut the strips using my paper cutter. Don't forget your days of the week as well! One thing I will say, on the back of each strip, are the main ingredients for the dish, that way when I grocery plan, I can know what I really need to add to the list. Loved that idea from one of the boards above!

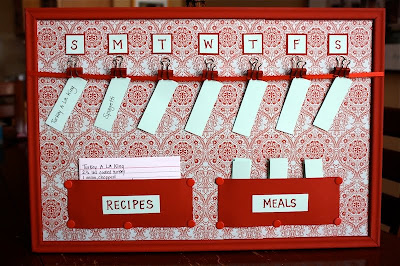
Now that I know how long the strips would be I can attach the biased tape. Do 2 rows, one for main dish and one for side dish. The main dish strip is about 1.5-2" down from the top, and the side dish bias tape is about 7 inches down from the top. Cut your biased tape and wrap it around, pulling nice and tight, and stapling it on the back.
Using my hot glue gun, I attached the days of the week to the very top of the board. Then I used my handy ruler to go vertically, and I put a dab of glue under the bias tape to keep the paper clips from moving over. You can't see it, but it keeps things nicely spaced, in my opinion.

A note about Saturday's in this photo: It says Babysitter (main dish) and Pizza (side dish).
So I know what we need to do for the sitter. EASY!


Add your paper clips (I know I had binder clips in the "Supplies" photo, but they were too stiff, so I changed plans, and I like this result much better). I used white on top and black on bottom. I had them, why not? Underneath the red bias tape is the hot glue dab, can't see it! But it keeps things lined up nicely (I am anal about that).


I used Command Picture Hanger strips to attach it to my cabinet door. So easy and not permanent.


To hold the various menu items, I cut a Crystal Light container in half, then cut a hole in the lid. Then I hot glued the lid to the top to keep it cleaner. I used a scrap of paper to cover it. Attached it to the door with a Command strip. I also used a small square of scrap paper and thumb tacks to make a small pocket on the board itself. It holds the side dish options. I made these in code, like the Magnetic board linked above. Q=Quinoa, B=Bread, P=Pasta/Potato, F=Fruit, S=Salad, R=Rice, V=Vegetable This makes it easy! Normally I give the kids the choice on the veggie, so in addition, they might pick something out in addition, which is fine with me.


Then I went to Office Depot, bought 3 Bound Presentation Binders that held 48 sheets. Divided it up and put all my recipes inside. Then I put them in an Ikea Magazine holder on the counter.


All Finished! And ready to be used! Let me know what you think, by commenting!
Photobucket

01 March 2012

"Blue Rajah" Crochet Bracelet

I made this crochet bracelet last night. I think it turned out really well! It was pretty easy to do, but I had never used thread before, so that was a bit different.

I found the pattern on Ravelry,  written by Melody Maria Fulone. The author of the pattern says: "Faint glimpses of Indian culture can be seen in this lacy bracelet. The clear blue color is a classic choice. It is constructed back and forth in rows, and secured with a button. Everyone will be asking you where you bought it, so prepare for compliments!" I think she's totally right. I love it.  I have red thread (number 3 though) but I'll try it again. This time I'll get the one side perfected (I goofed on row 1, I think). 


Basic Supplies needed:
#10 Crochet thread
1.65mm Steel hook
Button
Pattern (free download from Ravelry, but you have to join).


Enjoy!


Photobucket

17 February 2012

Lego Birthday Invite-How to!

I am working on Chandler's 7th (gasp) birthday party. It's a Lego theme. :) No surprise there. So after playing and having a ton of "waste my time" time on Pinterest (what?! You don't know what I am talking about?! You must find out what this amazing, awesome, place is, like yesterday!) I found some ideas for his party. Here's my board, you can find some ideas here, need an invite (It's invite only), leave a comment. I'll hook you up. Melissa on Pinterest

Supplies:
Card-stock in kiddo's favorite color or Lego colors (yellow, red, blue)
Photo printed
Paper cutter
2" diameter circle cutter or circut
Black thin Sharpie
Foam Adhesive circles
Double sided tape

Chandler's invite is a 5x5 inch square of  card-stock (scrapbook paper I had laying around, in yellow). I snapped a photo, and edited it in a graphics program (Fireworks CS3). He's holding a Lego Base Plate with Legos around and the number 7 in the center (Thank you Pinterest). I played with the photo, composition and how I wanted it to look. I shot him on the patio and I was up on a chair. I knew I needed the shot to crop to 4x4" square. I think I took 25 shots. I did my editing magic making him black and white and keeping the Lego 7  in color. Sent to Costco, had them printed on 4x6, and then cut them down to size. Then I used some double sided tape to attach. This was the easy part. I added "Chandler is" to the top since I figured, I should make it a bit more obvious. ;)


I bought some Foam Adhesive Circles at Michael's to give the Lego Stud 3D effect.


I also bought a 2" diameter circle punch to cut out 70+ circles. Much easier and worth the $8-10! If you have a Circut, then you could use that I am sure. I just don't have one, yet. LOL. You can see above how the back part of the invite is done.


I wrote all the details on the circles with a thin black Sharpie. Yes, hand written, it does suck, but whatever.  I added 4 foam circles to the invite, making them evenly spaced to give the 4 stud Lego look. The foam circles stick out just enough to give it definition. 

I added a map that I had drew in my graphics program, that included the address of the location as well as my cell if they get lost.


Last but not least, I had some orange envelopes from a previous b-day invite, so I used those. Nice and bright and it set the tone perfectly. Chandler loved his invites. And I loved the photo so much I had Costco print an 8x8" print that I am going to frame for his party. And yes, I am giving myself a pat on the back. :)

Hope you enjoy! If you need a Pinterest invite leave your email and I'll help you out. There are so many great ideas there! Enjoy!
Photobucket

22 March 2011

Granny Square bag!

My latest (completed) craft project is my granny square purse! Yes, an actual bag that I am actually using!

I got the pattern from Crochet Me. It's free, just have to sign up for their newsletter, which is actually pretty good! It's about 12x12 and the strap you can make as long as you want. I am still playing with the length. But so far so good.


I used Vanna's Choice in black, white and a variegated black/gray. Then I used Stitch N Bitch's Wool for the Aqua/Teal. Both worked up really nicely, and since I've never used either, it was a "gamble" on a project this intense.

I went to the local fabric store and got some sassy fabric that was light in color, so I could see the contents of my bag with our a flashlight. I used some biased tape to create a nice clean edge for the top. This step was the most intensive, and was not a part of the pattern. I just wanted something to keep my stuff inside, if I didn't do it I'd probably loose my $100 bluetooth. And that would cause Rob to be very mad at me. :)


I did each panel differently, so 4 squares in 3 different motifs. I made 9 out of the 12 squares in one night! So this whole project took maybe 5 nights. One thing I would change is getting 1 1/4" D rings versus the 2" D ring. I used the 2" and it didn't hold the strap. So I fixed it and it's much better. Also since I was already sewing the liner to the bag (which worked really well to my surprise), I made a narrow strip, hemmed it and sewed that to the strap to help strengthen the strap and small strap that holds the D rings. I know I tend to over load my bag (ask any friend), so this was important.

Over all, I'd say this was an easy beginner crochet project, the sewing part would add to the difficulty but you can omit that part. I see myself making another one of these for the summer in some bright colors!

11 June 2009

How to make a scoreboard headboard!


By request, here are step by step instructions on how we made Chandler Field! Total size is 55" wide by 48" tall by 1.5" deep. Perfect for a full size bed. Post pictures when you are done, and if you have questions, just ask! I'd be happy to help!

Materials:

3/4" plywood cut to 48" X 24" (24" is min. but I think I'd do 30" next time)
2-4' long pieces of 1x4
2-4' long pieces of 1x6
10 1" wood screws
Additional wood screws for attaching to wall
Chalkboard paint (or plain black paint if you don't want to be able to draw on it)
Green paint (we used the color of his room, so it was just the extra)
White acrylic paint (from Michael's) the craft kind
1" foam paint brushes for the acrylic paint (get a few, you never know when they break)
3" letters for the "home, away, qtr" They are vinyl meant for boat registrations, find at sporting goods stores.
6" Wood letters to name the Field, find at Michael's or Joanne's.
Wood glue for letters

Tools:
Drill & bits for screws
Sand paper
Blue painters tape in 1"
Paint supplies
Heavy weight, grips, blocks to hold letters in position while gluing.


How To:

Take one each of the 1x4 and 1x6 and stack them with the one side flush to each other, with the 1x6 is on the bottom. Screw them together using 3 screws places evenly along the 4' length (see green circles). Repeat for other post.

Sand and wipe off dust of all wood. You only need to sand the parts you will be painting.

Paint the black first, so it can be dried first. Paint at least 2 coats, so it's nice and black.

Paint the green posts, you will paint the 1x4 and 1x6 the tops & sides, look at picture for a guide of how it will be assembled so you don't have to waste paint (blue numbers).
Let dry, probably overnight. Make sure black is really dry before taping off!

For the lines:

Measure up from the bottom of the board 16" and mark the line.Then measure from the top down 7.5" and mark the line. Do this across the board. Take 2 pieces of 1" painters tape and follow the lines across the top (this makes the top line under the name)

Now measure from the left 15" below where the line will be and mark it. Then mark 16" from the left. Place the right side of the 1" tape on the 15" mark, then place the left side of the tape on the 16" mark. Making a 1" black stripe to be painted. See photo for reference measurements in red. Repeat for the right side.

Using white paint, paint the taped off areas with a foam brush. You will do a few coats, but it doesn't take long for the paint to dry. While waiting, place letters on newspaper and paint the letters, again will need 2 coats. Let dry.

Once all the white is dry, you can apply the 3" boat letters. Place them as you want, I just made a line with 1" paint tape and placed them all on the same line. Easy.

Now take the white letters and figure out your spacing for the name of the field. Glue them on with the wood glue. Place books, heavy objects on them so they don't move. Let dry.

Assembly:

Using the 4 remaining wood screws, attach the board to the posts, see picture for guide.
Attach to wall using appropriate anchors, or you can attach to a Hollywood style bed frame.

07 February 2009

My creations...

I have been crocheting like a mad woman. :) It's fun and relaxing, hence the lack of posts. I recently found a new site, www.ravelry.com and it's awesome for those interested in yarn crafts! In there I found a longies pattern to make for Lincoln!
Here's Lincoln modeling the longies I made.
It took me just over a week to make them, and they are 100% wool, so they can be used over the diaper w/o a cover.

And these are the longies that I made for my cousin's new daughter, Lucy. They are made with Wool from Chile and it's hand dyed. Very soft after I lanolized them!


I just joined a yarn of the month club to make new ones every month, I am so excited to do that! It's with hand dyed wool too! I will post when I get them done!

13 October 2008

Halloween crafts!

I am getting ready to decorate for halloween and I am so excited! I wanted to add some new stuff to the decor, so I am looking at sites... So I am going to post some here (mainly for my own referance, but for yours too):

Witch's Curtain

Materials:
Black lawn and leaf bag
scissors

Lay a heavy-duty black garbage bag flat on a work surface, open end toward you. With scissors, cut 1 1/2-inch vertical strips from the bottom, stopping a few inches from the top. Cut open one side seam, then unfold bag. Use masking tape or tacks to hang. Then, with hands a few inches apart, grasp each strand and pull; stretch strands in several places for a decrepit effect.
First Published: Special Issue 2004--Martha Stewart
Source

Cheesecloth Ghosts

Materials:
1 package of cheesecloth
Fabric Stiffener
Plastic bag or bowl
Plastic Soda/Water Bottle
3” Styrofoam Ball
2 pieces of 20 gauge floral wire
Masking Tape or Mounting Tape
Plastic Wrap
2 –20 mm (wiggle eyes) Moving Eyes
Optional: Plastic spiders, bugs etc.

Instructions

  1. Tape the Styrofoam ball to the top of the bottle cap. Or form a ball from scratch paper and tape to the bottle cap.

  2. Wrap one end of the floral wire around the neck of the bottle. Bend in the other end and shape wire as desired for arms. Repeat with the other wire on the other side for the other arm. This is your ghost frame.

  3. Drape the ghost frame figure in plastic wrap.

  4. Cut cheesecloth into strips double the height of your ghost frame and about 1½” x 2” wide.

  5. There are two methods to covering the cheesecloth strips with fabric stiffener. You can pour fabric stiffener in a bowl and dip strips in the liquid. Or a less messy way is to place fabric stiffener and cheesecloth strips into a plastic bag. You can work the stiffener into the cheesecloth from outside of the bag.

  6. When cheesecloth is completely covered with fabric stiffener, place strips over the plastic covered ghost frame. Place your strips at different angles to add more detailed interest to your ghost. Continue adding strips until the ghost frame is completely covered.

  7. Set aside to dry.

  8. When the ghost is completely dry, remove from the plastic covered frame. Cheesecloth should be stiff and be able to stand alone.

  9. Glue on the two moving eyes. For added detail, glue on small spiders and bugs onto the ghost. Display on a table top with spider webs or attach a hanger and hang from the ceiling.

Source

More Links to fun stuff!!
20 Halloween Crafts
K-3 Crafts
Preschool Crafts
More Preschool Crafts

19 September 2008

Chandler's Letter word book!

Thanks to Allie's blog, http://www.notimeforflashcards.com/ we spent an hour shooting pictures around the house last sunday while Rob played poker. Then I broke out the printer and printed out the shots. I gathered an extra binder, sheet protecters and cut some scrapbook paper into 8x11 sheets. I got the letters at Target's dollar spot.
It was so fun. I am missing some pictures of some letters (ah, I just figured out X-xylophone!) but I will get it done this weekend. :)
Here are some pictures of the book!


Chandler took the book to bed with him tonight! It was so cute! We are working on getting his speech more understandable so these are words he can say, but need work (most of them at least).